나만의 gymnasium 패키지 만들기(1)
GridWorldEnv
이번 포스트에서는 나만의 커스텀 환경을 만드는 방법을 살펴볼 예정입니다. 이 포스트의 내용은 거의 Create a Custom Environment 이 페이지의 내용을 번역, 해설한 내용에 제가 필요하다고 생각하는 내용을 덧 붙인 글이 될 것입니다. 따라서 원문을 보고 자세히 공부해 보는 것도 좋을 듯합니다.
이 Gymnasium 문서에서 고려하는, custom 환경으로 만들고자 하는 게임은 GridWorldEnv라는 게임이군요. 이 게임이 무엇인지 먼저 살펴보겠습니다.
Basic information about the game
- Observations provide the location of the target and agent.
- There are 4 discrete actions in our environment, corresponding to the movements “right”, “up”, “left”, and “down”.
- The environment ends (terminates) when the agent has navigated to the grid cell where the target is located.
- The agent is only rewarded when it reaches the target, i.e., the reward is one when the agent reaches the target and zero otherwise.
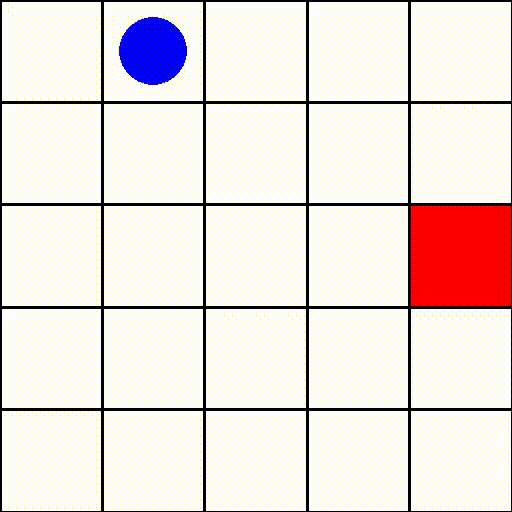
위 이미지를 보시면 딱 어떤 게임인지 감이 오실거라 믿습니다. 파란원으로 표현된 agent가 빨간 네모로 표현된 target을 찾아가는 게임이군요. 주목할 만한 점은 이 게임은 cartpole과는 다르게 reword가 최종 target에 도달 했을 때만 주어진다는 점입니다. 이처럼 지연된 보상을 주는 강화학습 게임들이 많이 존재하고 이 게임도 그 중 하나입니다.
__init__ function
이전 gymnasium 패키지로부터 독립하기 포스트를 읽어보신 분은 cartpole 클래스 내부가 어떻게 구성되어 있는지 기억하실 겁니다. 클래스 인스턴스가 생생될 때 실행되어야 할 __init__ 함수, step 함수 등이 구현되어 있었습니다. 마찬가지로 custom 게임을 구현할 때 이런 함수들을 직접 구현하여야 합니다. 이 절에서는 __init__ 함수를 살펴 보겠습니다.
from typing import Optional
import numpy as np
import gymnasium as gym


class GridWorldEnv(gym.Env):

    def __init__(self, size: int = 5):
        # The size of the square grid
        self.size = size

        # Define the agent and target location; randomly chosen in `reset` and updated in `step`
        self._agent_location = np.array([-1, -1], dtype=np.int32)
        self._target_location = np.array([-1, -1], dtype=np.int32)

        # Observations are dictionaries with the agent's and the target's location.
        # Each location is encoded as an element of {0, ..., `size`-1}^2
        self.observation_space = gym.spaces.Dict(
            {
                "agent": gym.spaces.Box(0, size - 1, shape=(2,), dtype=int),
                "target": gym.spaces.Box(0, size - 1, shape=(2,), dtype=int),
            }
        )

        # We have 4 actions, corresponding to "right", "up", "left", "down"
        self.action_space = gym.spaces.Discrete(4)
        # Dictionary maps the abstract actions to the directions on the grid
        self._action_to_direction = {
            0: np.array([1, 0]),  # right
            1: np.array([0, 1]),  # up
            2: np.array([-1, 0]),  # left
            3: np.array([0, -1]),  # down
        }
이 GridWorld 환경을 만들기 위해서는 gym의 기본 추상 클래스인 gymnasium.Env를 상속받아야 한다고 메뉴얼에서 설명하고 있습니다.
class GridWorldEnv(gym.Env):
추상 클래스는 그 자체로 직접 사용될 수 없습니다. 이 추상 클래스를 바탕으로 실제 클래스(GridWorldEnv)를 정의하여 사용하여야 하고 이때 세부적으로 구현하여야 할 항목으로 observation 공간, action 공간, reset 함수, setp 함수 등이 있습니다.
gymnasium 공식 메뉴얼에서는 __init__ 함수 내부에 먼저 observation 공간을 정의하고 있네요. 그 모양은 {"agent": array([1, 0]), "target": array([0, 3])}와 같은 형태입니다. python 문법을 아신다면 바로 아실 수 있겠죠. dictionary 자료형입니다.
        self.observation_space = gym.spaces.Dict(
            {
                "agent": gym.spaces.Box(0, size - 1, shape=(2,), dtype=int),
                "target": gym.spaces.Box(0, size - 1, shape=(2,), dtype=int),
            }
        )
위 코드를 자세히 살펴 볼까요? gym 패키지에 spaces 모듈의 Space 추상 클래스를 상속받은 Dict 클래스의 인스턴스를 observation 공간에 등록했군요. dictionary의 값(value)은 또 gym.spaces.Box 클래스의 인스턴스로 정의되어있군요.
        # We have 4 actions, corresponding to "right", "up", "left", "down"
        self.action_space = gym.spaces.Discrete(4)
        # Dictionary maps the abstract actions to the directions on the grid
        self._action_to_direction = {
            0: np.array([1, 0]),  # right
            1: np.array([0, 1]),  # up
            2: np.array([-1, 0]),  # left
            3: np.array([0, -1]),  # down
        }
다음으로 action 공간입니다. action 공간은 gym.spaces.Discrete(4), 즉 Discrete 클래스의 인스턴스로 정의되어있습니다. Discrete라는 이름에서 감이 오시나요? {0, 1, 2, 3}라는 정수 집합을 만들어주는 클래스입니다. _action_to_direction 변수는 단순히 0,1,2,3을 key로 가지는 dictionary를 담고있네요.
get function
객체지향 프로그래밍에서 이처럼 각 클래스 내부 변수의 현재 값을 얻는 함수를 만들어두는 경우는 매우 흔합니다. 공식 메뉴얼에서는 두개의 get 함수를 정의하고 있네요. 둘다 dictionary 변수를 반환합니다.
    def _get_obs(self):
        return {"agent": self._agent_location, "target": self._target_location}

    def _get_info(self):
        return {
            "distance": np.linalg.norm(
                self._agent_location - self._target_location, ord=1
            )
        }
_get_obs 함수는 현재 agent의 위치와 target의 위치, 즉 observation을 반환합니다. _get_info 함수는 agent와 target 사이 norm을 반환하는 군요. reward 등을 계산할 때 유용하게 사용될 수 있어보입니다.
reset function
    def reset(self, seed: Optional[int] = None, options: Optional[dict] = None):
        # We need the following line to seed self.np_random
        super().reset(seed=seed)

        # Choose the agent's location uniformly at random
        self._agent_location = self.np_random.integers(0, self.size, size=2, dtype=int)

        # We will sample the target's location randomly until it does not coincide with the agent's location
        self._target_location = self._agent_location
        while np.array_equal(self._target_location, self._agent_location):
            self._target_location = self.np_random.integers(
                0, self.size, size=2, dtype=int
            )

        observation = self._get_obs()
        info = self._get_info()

        return observation, info
reset 함수 역시 실제 클래스를 만들때 구현해야할 함수입니다. 이 함수는 새로운 에피소드가 시작 될 때 초기화하는 역할을 합니다. 초기화 시에는 agent와 target의 위치를 랜덤하게 결정합니다. 만약 랜덤하게 정해진 agent와 target의 위치가 동일하면 target의 위치를 계속해서 새로 뽑는 방식으로 구현되어 있는 것을 볼 수 있습니다.
step function
계속해서 공식 메뉴얼을 살펴보겠습니다. step 함수는 action을 입력받아 다음 state를 계산하는 함수라고 합니다. 물론 이 함수도 실제 클래스에서 구현되어야 합니다.
For our environment, several things need to happen during the step function:
- We use the self._action_to_direction to convert the discrete action (e.g., 2) to a grid direction with our agent location. To prevent the agent from going out of bounds of the grid, we clip the agent’s location to stay within bounds.
- We compute the agent’s reward by checking if the agent’s current position is equal to the target’s location.
- Since the environment doesn’t truncate internally (we can apply a time limit wrapper to the environment during make()), we permanently set truncated to False.
- We once again use _get_obs and _get_info to obtain the agent’s observation and auxiliary information.
공식 메뉴얼에 따르면 step 함수 실행시 아래와 같은 일들이 벌어져야 한다고 적혀있습니다.
- agent가 그리드 경계를 벗어나지 않도록 합니다. np.clip() 함수를 이용하여 좌표 값을 잘라냅니다. 예를 들어 그리드의 size가 5인 게임에서 좌표 값이 -1이 되면 0으로 바꾸고 5가 되면 4로 바꾸는 동작이 수행됩니다.
- agent의 현재 위치가 target의 위치와 같은지 확인하고 reward를 계산해야 합니다.
- 환경이 __truncate__되지 않습니다. 이말은 agent가 target을 찾기 전까지 게임이 끝나지 않는다는 것을 의미한다. 예를 들어 “100번 수행동안 agent가 target을 찾지 못하면 강제 종료”와 같은 조건이 없습니다. 이전 cartpole에서는 이 truncate 조건이 있었습니다.
- _get_obs와 _get_info를 이용해서 observation과 information을 얻을 수 있습니다.
먼저 코드를 살펴보겠습니다.
    def step(self, action):
        # Map the action (element of {0,1,2,3}) to the direction we walk in
        direction = self._action_to_direction[action]
        # We use `np.clip` to make sure we don't leave the grid bounds
        self._agent_location = np.clip(
            self._agent_location + direction, 0, self.size - 1
        )

        # An environment is completed if and only if the agent has reached the target
        terminated = np.array_equal(self._agent_location, self._target_location)
        truncated = False
        reward = 1 if terminated else 0  # the agent is only reached at the end of the episode
        observation = self._get_obs()
        info = self._get_info()

        return observation, reward, terminated, truncated, info
천천히 살펴보시면 이 함수 역시 전혀 복잡하지 않은게 보이시나요? 먼저 _action_to_direction 사전에서 action 번호, 즉 {0,1,2,3} 각각에 맞는 direction 을 반환해 줍니다. _action_to_direction 변수는 __init__ 함수에서 초기화 되어 있는 것을 볼 수 있습니다. np.clip() 함수의 역할은 위에서 설명한대로 범위를 벗어나면 잘라버리는 동작을 합니다. 즉 게임 grid를 벗어나지 않도록 합니다. 다음으로 agent와 target의 위치를 비교하여 둘의 좌표가 같으면 게임을 종료하라는 terminated 변수를 true로 바꿉니다.
네 여기까지가 실제 GridWorldEnv 환경을, 실제 클래스를 구성하는 방법에 관한 내용이었습니다. 이제부터는 만들어진 custom 환경을 사용하는 방법을 살펴볼 것입니다.
등록 및 환경 만들기
먼저 지금까지 만든 클래스가 정상적으로 동작하는지 확인해보는 과정을 알아보겠습니다. 메뉴얼에 따르면 등록(register)과 만들기(make) 과정을 거쳐야 한다고 합니다.
gym.register(
    id="gymnasium_env/GridWorld-v0",
    entry_point=GridWorldEnv,
)
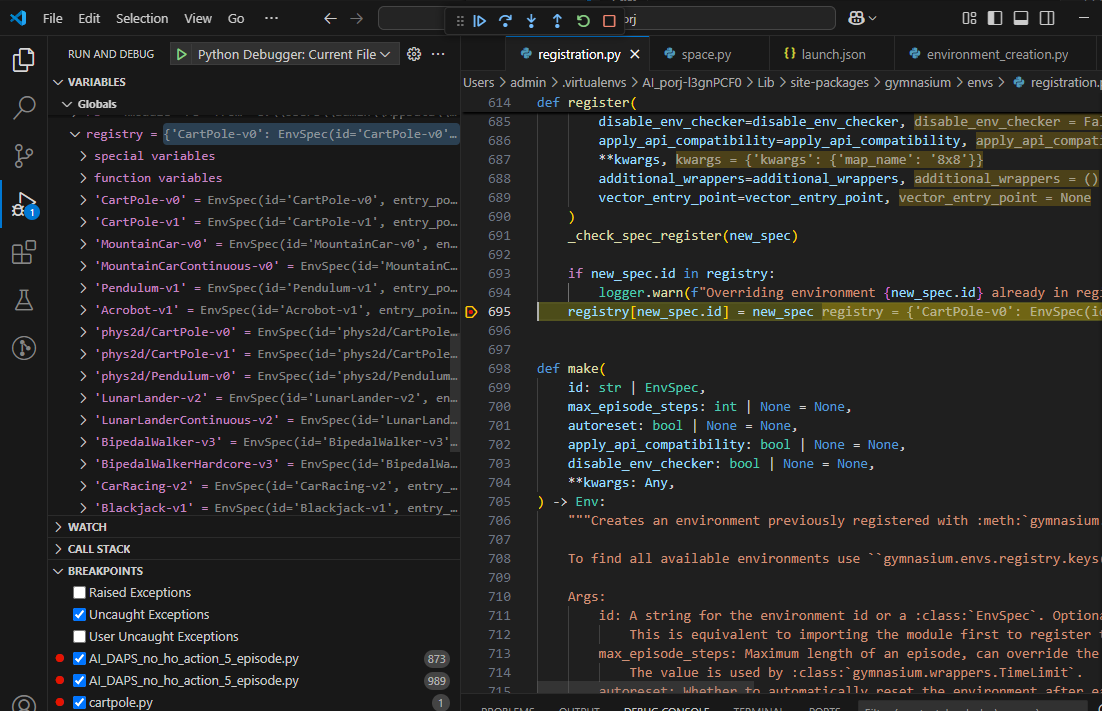
먼저 register() 함수를 살펴보겠습니다. 말 그대로 이 환경을 등록하는 것입니다. 내부적으로 register() 함수가 어떻게 동작하는지 살펴 볼까요? 그림에 보시는 것과 같이 단순히 registry 라는 dictionary 자료형 변수에 요소를 집어 넣는 동작입니다. 이때 key는 id 이고 value는 각 환경의 클래스 인 것을 볼 수 있습니다.
register() 공식 메뉴얼을 보면 id라는 문자열을 어떻게 구성해야되는지 설명하고 있습니다. [namespace/](env_name)[-v(version)] 이와 같이 구성되도록 id를 설정하면 됩니다. 이러한 방식으로 설정된 환경 id는 "gymnasium_env/GridWorld-v0"입니다.
다음으로 make() 함수입니다. 이 make 함수는 이전 cartpole 예제에서도 봤던 함수입니다. make 함수는 id를 이용해 등록된 환경을 찾고 환경 클래스의 인스턴스를 반환하여 우리가 사용할 수 있도록 합니다. 만약 렌더링을 통해 게임 화면을 시각화하고 싶으면 render_mode 변수를 “human”으로 설정하면 됩니다. 이 포스트에서는 아직 설명하지 않았지만, rendering을 하고 싶으면 이와 관련된 함수를 구현해야합니다.
# Without randering
my_env = gym.make("gymnasium_env/GridWorld-v0")
# With randering
my_env = gym.make("gymnasium_env/GridWorld-v0", render_mode="human")
cartpole을 비롯해 gymnasium에 포함된 모든 기본 환경들 역시 이 포스트에서 설명한 등록의 과정을 거칩니다. 그럼 이 등록 과정은 어디에서 이루어 질까요? 바로 gymnasium 패키지를 import할 때 이루어집니다. 내부를 잘 뜯어보면 모든 기본 환경들 하나하나 전부 등록되는 것을 확인할 수 있을겁니다. 등록되는 소스코드가 어디인지, 어떤 파일인지 한번 직접 찾아보는 것도 공부에 큰 도움이 될 것입니다.
전체 코드
지금까지 설명한 내용을 정리해 보겠습니다. 위에서 작성된 코드를 하나의 파일안에 복사하면 이렇게 될 것입니다. 파일 이름은 gridworld.py 이런식으로 정해도 되겠죠?
from typing import Optional
import numpy as np
import gymnasium as gym

import pygame

import math
import random
import matplotlib
import matplotlib.pyplot as plt
from collections import namedtuple, deque
from itertools import count

import torch
import torch.nn as nn
import torch.optim as optim
import torch.nn.functional as F

class GridWorldEnv(gym.Env):
    metadata = {"render_modes": ["human", "rgb_array"], "render_fps": 4}
    def __init__(self, render_mode=None, size: int = 5):
        # The size of the square grid
        self.size = size
        self.window_size = 512  # The size of the PyGame window

        # Define the agent and target location; randomly chosen in `reset` and updated in `step`
        self._agent_location = np.array([-1, -1], dtype=np.int32)
        self._target_location = np.array([-1, -1], dtype=np.int32)

        # Observations are dictionaries with the agent's and the target's location.
        # Each location is encoded as an element of {0, ..., `size`-1}^2
        self.observation_space = gym.spaces.Dict(
            {
                "agent": gym.spaces.Box(0, size - 1, shape=(2,), dtype=int),
                "target": gym.spaces.Box(0, size - 1, shape=(2,), dtype=int),
            }
        )

        # We have 4 actions, corresponding to "right", "up", "left", "down"
        self.action_space = gym.spaces.Discrete(4)
        # Dictionary maps the abstract actions to the directions on the grid
        self._action_to_direction = {
            0: np.array([1, 0]),  # right
            1: np.array([0, 1]),  # up
            2: np.array([-1, 0]),  # left
            3: np.array([0, -1]),  # down
        }

        assert render_mode is None or render_mode in self.metadata["render_modes"]
        self.render_mode = render_mode

        self.window = None
        self.clock = None

    def _get_obs(self):
        return {"agent": self._agent_location, "target": self._target_location}

    def _get_info(self):
        return {
            "distance": np.linalg.norm(
                self._agent_location - self._target_location, ord=1
            )
        }

    def reset(self, seed: Optional[int] = None, options: Optional[dict] = None):
        # We need the following line to seed self.np_random
        super().reset(seed=seed)

        # Choose the agent's location uniformly at random
        self._agent_location = self.np_random.integers(0, self.size, size=2, dtype=int)

        # We will sample the target's location randomly until it does not coincide with the agent's location
        self._target_location = self._agent_location
        while np.array_equal(self._target_location, self._agent_location):
            self._target_location = self.np_random.integers(
                0, self.size, size=2, dtype=int
            )

        observation = self._get_obs()
        info = self._get_info()

        if self.render_mode == "human":
           self._render_frame()

        return observation, info

    def step(self, action):
        # Map the action (element of {0,1,2,3}) to the direction we walk in
        direction = self._action_to_direction[action]
        # We use `np.clip` to make sure we don't leave the grid bounds
        self._agent_location = np.clip(
            self._agent_location + direction, 0, self.size - 1
        )

        # An environment is completed if and only if the agent has reached the target
        terminated = np.array_equal(self._agent_location, self._target_location)
        truncated = False
        reward = 1 if terminated else 0  # the agent is only reached at the end of the episode
        observation = self._get_obs()
        info = self._get_info()

        if self.render_mode == "human":
            self._render_frame()

        return observation, reward, terminated, truncated, info

    def render(self):
        if self.render_mode == "rgb_array":
            return self._render_frame()

    def _render_frame(self):
        if self.window is None and self.render_mode == "human":
            pygame.init()
            pygame.display.init()
            self.window = pygame.display.set_mode(
                (self.window_size, self.window_size)
            )
        if self.clock is None and self.render_mode == "human":
            self.clock = pygame.time.Clock()

        canvas = pygame.Surface((self.window_size, self.window_size))
        canvas.fill((255, 255, 255))
        pix_square_size = (
            self.window_size / self.size
        )  # The size of a single grid square in pixels

        # First we draw the target
        pygame.draw.rect(
            canvas,
            (255, 0, 0),
            pygame.Rect(
                pix_square_size * self._target_location,
                (pix_square_size, pix_square_size),
            ),
        )
        # Now we draw the agent
        pygame.draw.circle(
            canvas,
            (0, 0, 255),
            (self._agent_location + 0.5) * pix_square_size,
            pix_square_size / 3,
        )

        # Finally, add some gridlines
        for x in range(self.size + 1):
            pygame.draw.line(
                canvas,
                0,
                (0, pix_square_size * x),
                (self.window_size, pix_square_size * x),
                width=3,
            )
            pygame.draw.line(
                canvas,
                0,
                (pix_square_size * x, 0),
                (pix_square_size * x, self.window_size),
                width=3,
            )

        if self.render_mode == "human":
            # The following line copies our drawings from `canvas` to the visible window
            self.window.blit(canvas, canvas.get_rect())
            pygame.event.pump()
            pygame.display.update()

            # We need to ensure that human-rendering occurs at the predefined framerate.
            # The following line will automatically add a delay to keep the framerate stable.
            self.clock.tick(self.metadata["render_fps"])
        else:  # rgb_array
            return np.transpose(
                np.array(pygame.surfarray.pixels3d(canvas)), axes=(1, 0, 2)
            )

    def close(self):
        if self.window is not None:
            pygame.display.quit()
            pygame.quit()

gym.register(
    id="gymnasium_env/GridWorld-v0",
    entry_point=GridWorldEnv,
)

#my_env = gym.make("gymnasium_env/GridWorld-v0", render_mode="human")
my_env = gym.make("gymnasium_env/GridWorld-v0")
게임 rendering, pygame과 관련된 함수들이 추가적으로 구현되어 있습니다. 이 함수들은 render(), _render_frame() 그리고 close() 함수입니다. 이 함수들의 자세한 설명은 생략하고 출처를 남겨 놓겠습니다. 이 출처는 custom 환경을 만드는 방법 심화 버전입니다.